Posts Tagged :

frontend

Components on Blazor 1024 557 mezo

Components on Blazor

Hi my fellow Padawans

Blazor is a frontend framework like Angular or React but mostly like React and it has components for create pages and reusable objects functionalities.

But how can we create a component and use it on the pages in our Blazor application?

First Read this Article and create your first Blazor application 🙂

Then on your Solution Explorer find Pages and right click on it and Add -> Razor Component

On Add New Item windows write your components name and create it

I decided to make something different and I created Todo.Razor file and I add these codes on the page

@page "/todo"
@using BlazorApp1.Data;

<h3>Todo</h3>

<ul>
    @foreach (var todo in todos)
    {
            <li>@todo.Title</li>
    }
</ul>

<input placeholder="Something todo" @bind="newTodo" />
<button @onclick="AddTodo">Add todo</button>

@code {
    private List<TodoItem> todos = new();
    private string? newTodo;

    private void AddTodo()
    {
        if (!string.IsNullOrWhiteSpace(newTodo))
        {
            todos.Add(new TodoItem { Title = newTodo });
            newTodo = string.Empty;
        }
    }
}

And find NavMenu.razor file inside of the Shared folder on your Solution Explorer. Find the last item of menu divs and Add this code:

  <div class="nav-item px-3">
            <NavLink class="nav-link" href="todo">
                <span class="oi oi-list-rich" aria-hidden="true"></span> Todo
            </NavLink>
        </div>

You will have a NavMenu.Razor page like this:

<div class="top-row ps-3 navbar navbar-dark">
    <div class="container-fluid">
        <a class="navbar-brand" href="">BlazorApp1</a>
        <button title="Navigation menu" class="navbar-toggler" @onclick="ToggleNavMenu">
            <span class="navbar-toggler-icon"></span>
        </button>
    </div>
</div>

<div class="@NavMenuCssClass" @onclick="ToggleNavMenu">
    <nav class="flex-column">
        <div class="nav-item px-3">
            <NavLink class="nav-link" href="" Match="NavLinkMatch.All">
                <span class="oi oi-home" aria-hidden="true"></span> Home
            </NavLink>
        </div>
        <div class="nav-item px-3">
            <NavLink class="nav-link" href="counter">
                <span class="oi oi-plus" aria-hidden="true"></span> Counter
            </NavLink>
        </div>
        <div class="nav-item px-3">
            <NavLink class="nav-link" href="fetchdata">
                <span class="oi oi-list-rich" aria-hidden="true"></span> Fetch data
            </NavLink>
        </div>
        <div class="nav-item px-3">
            <NavLink class="nav-link" href="todo">
                <span class="oi oi-list-rich" aria-hidden="true"></span> Todo
            </NavLink>
        </div>
    </nav>
</div>

@code {
    private bool collapseNavMenu = true;

    private string? NavMenuCssClass => collapseNavMenu ? "collapse" : null;

    private void ToggleNavMenu()
    {
        collapseNavMenu = !collapseNavMenu;
    }
}

When you open the webpage you will see the Todo on your left navigation menu and then you will see your amazing Todo application like below:

If you want to use this component in other pages for example add this component on the home page. Go to your Index.Razor inside of the Pages folder and add this code :

<Todo/>

Your index.Razor will look like this

@page "/"

<PageTitle>Index</PageTitle>

<h1>Hello, Everyone!</h1>

Welcome to your new app. Hello 

<SurveyPrompt Title="How is Blazor working for you?" />


<Todo/>

Then we RUN our app oooorrr we can Hot Reload and we will see the result like below:

That is easy isn’t it ?

I hope that is helpful

May the knowledge be with you

Binary representation of floating-point numbers 1024 420 mezo

Binary representation of floating-point numbers

Have you ever considered the process by which computers store floating-point numbers such as 3.1416 (𝝿) or 9.109 × 10⁻³¹ (the mass of the electron in kg) in the memory which is limited by a finite number of ones and zeroes (aka bits)?

For integers (i.e., 17). It appears to be fairly straightforward. Assume we have 16 bits (2 bytes) to store the number. We can store integers between 0 and 65535 in 16 bits:

(0000000000000000)₂ = (0)₁₀

(0000000000010001)₂ =
    (1 × 2⁴) +
    (0 × 2³) +
    (0 × 2²) +
    (0 × 2¹) +
    (1 × 2⁰) = (17)₁₀

(1111111111111111)₂ =
    (1 × 2¹⁵) +
    (1 × 2¹⁴) +
    (1 × 2¹³) +
    (1 × 2¹²) +
    (1 × 2¹¹) +
    (1 × 2¹⁰) +
    (1 × 2⁹) +
    (1 × 2⁸) +
    (1 × 2⁷) +
    (1 × 2⁶) +
    (1 × 2⁵) +
    (1 × 2⁴) +
    (1 × 2³) +
    (1 × 2²) +
    (1 × 2¹) +
    (1 × 2⁰) = (65535)₁₀

On the off chance that we really want a marked number we might utilize two’s supplement and shift the scope of [0, 65535] towards the negative numbers. For this situation, our 16 pieces would address the numbers in a scope of [-32768, +32767].

As you would have seen, this approach will not permit you to address the numbers like – 27.15625 (numbers after the decimal point are simply being disregarded).

However, we’re not the initial ones who have seen this issue. Around ≈36 years ago a few brilliant people conquered this limit by presenting the IEEE 754 norm for floating-point arithmetic.

The IEEE 754 standard portrays the way (the framework) of utilizing those 16 bits (or 32, or 64 bits) to store the numbers of wider range, including the small floating numbers (smaller than 1 and closer to 0).

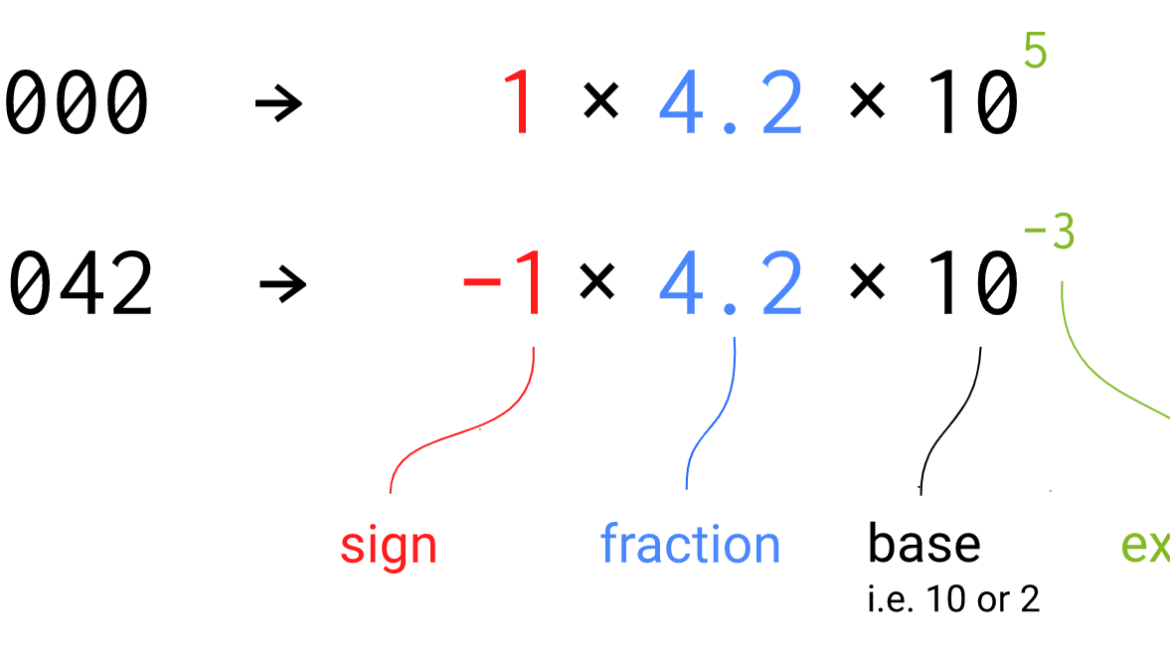
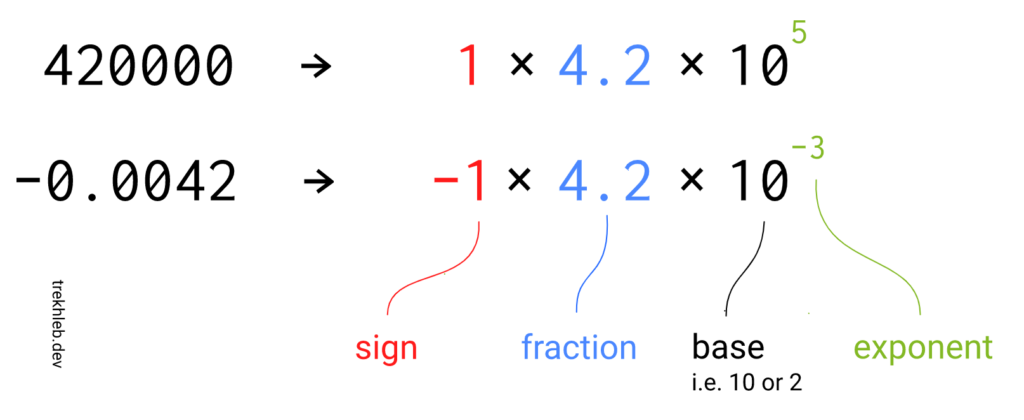
To get the thought behind the standard we could review the logical documentation – an approach to communicating numbers that are excessively huge or excessively little (for the most part would bring about a long string of digits) to be helpfully written in decimal structure.

As you might see from the picture, the number portrayal may be parted into three sections:

sign
division (otherwise known as significant) – the important digits (the significance, the payload) of the number
example – controls how far and in which direction to move the decimal point in the fraction
The base part we might preclude simply by settling on what it will be equivalent to. For our situation, we’ll involve 2 as a base.

Rather than utilizing every one of the 16 bits (or 32 bits, or 64 bits) to store the fraction of the number, we might share the bits and store a sign, type, and portion simultaneously. Contingent upon the numbers of bits that we will use to store the number we end up with the accompanying parts:

Floating-point formatTotal bitsSign bitsExponent bitsFraction bitsBase
Half-precision1615102
Single-precision3218232
Double-precision64111522

With this approach, the number of bits for the fraction has been reduced (i.e. for the 16-bits number it was reduced from 16 bits to 10 bits). It means that the fraction might take a narrower range of values now (losing some precision). However, since we also have an exponent part, it will actually increase the ultimate number range and also allow us to describe the numbers between 0 and 1 (if the exponent is negative).

For example, a signed 32-bit integer variable has a maximum value of 2³¹ − 1 = 2,147,483,647, whereas an IEEE 754 32-bit base-2 floating-point variable has a maximum value of ≈ 3.4028235 × 10³⁸.

To make it possible to have a negative exponent, the IEEE 754 standard uses the biased exponent. The idea is simple – subtract the bias from the exponent value to make it negative. For example, if the exponent has 5 bits, it might take the values from the range of [0, 31] (all values are positive here). But if we subtract the value of 15 from it, the range will be [-15, 16]. The number 15 is called bias, and it is being calculated by the following formula:

exponent_bias = 2 ^ (k−1) − 1

k - number of exponent bits

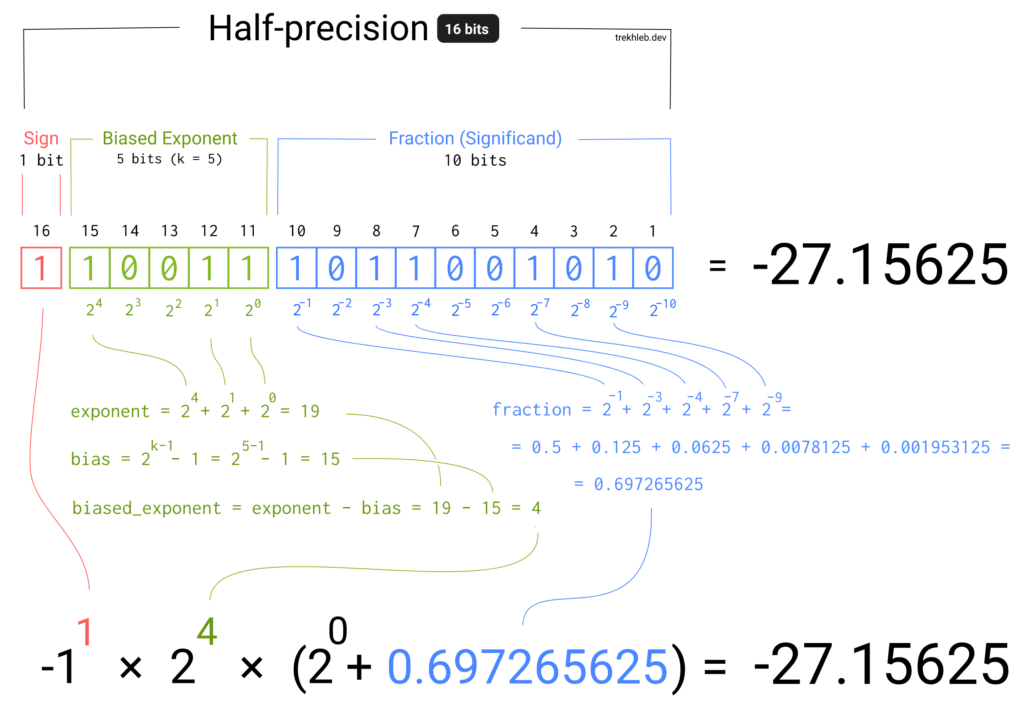
I’ve tried to describe the logic behind the converting of floating-point numbers from a binary format back to the decimal format on the image below. Hopefully, it will give you a better understanding of how the IEEE 754 standard works. The 16-bits number is being used here for simplicity, but the same approach works for 32-bits and 64-bits numbers as well.

Checkout the interactive version of this diagram to play around with setting bits on and off, and seeing how it would influence the final result

Here is the number ranges that different floating-point formats support:

Floating-point formatExp minExp maxRangeMin positive
Half-precision−14+15±65,5046.10 × 10⁻⁵
Single-precision−126+127±3.4028235 × 10³⁸1.18 × 10⁻³⁸

Be aware that this is by no means a complete and sufficient overview of the IEEE 754 standard. It is rather a simplified and basic overview. Several corner cases were omitted in the examples above for simplicity of presentation (i.e. -0-∞+∞ and NaN (not a number) values)

Code examples

In the javascript-algorithms repository, I’ve added a source code of binary-to-decimal converters that were used in the interactive example above.

Below you may find an example of how to get the binary representation of the floating-point numbers in JavaScript. JavaScript is a pretty high-level language, and the example might be too verbose and not as straightforward as in lower-level languages, but still it is something you may experiment with directly in the browser:

See the Pen bitsToFloat.js by mzekiosmancik (@mzekiosmancik) on CodePen.

References

You might also want to check out the following resources to get a deeper understanding of the binary representation of floating-point numbers:

Angular JS – Controller 657 486 mezo

Angular JS – Controller

Selam Arkadaslar

Yazmaya uzuuun bir ara verdikten sonar yine sizlerleyim 🙂 Angular JS konusuna devam edeceğiz. İlk yazımda AngularJS nedir mantığı nedir kısaca bahsettik. Bu yazıda ise MVC nin C sinden bahsedeceğim.

Controller

Controller MVC nin View’i yani son kullanıcının gördüğü ile model yani business logic katmanlarının iletişime geçtiği katmandır.  Yani kod yardimi ve model katmanı ile elde ettigimiz bir veriyi HTML kodlarına gönderme işini üstlenir. Aşağıdaki diagram bize Controller’ın görevini anlamakta biraz daha yardımcı olacaktır.

angularJs_mvc_framwork

Şimdi gelin isterseniz küçük bir örnek ile Controller ne işe yarıyor görelim. Öncelikle JS dosyaları ile çalışacağımızı belirtmek isterim herhangi bir editöre ihtiyacınız olmayacaktır Notepad++ işinizi görecektir. Tabi AngularJS kütüphanesinide buradan indirip eklemeyi unutmayın lütfen.

HTML dosyamizi asagidaki gibi oluşturuyoruz.

[codebox 1]

Ardından birde buradaki ng controller karşısında yer alan Controller1 adlı dosyamızı ekleyip içersine şu kodları eklemeliyiz.

[codebox 2]

Eklemiş olduğumuz ng-controller tagı ile html üzerinde çalışacak olan AngularJS kodlarının nereyi hedef alarak metotları araması ve çalıştırması gerektiğini belirtmiş olduk.

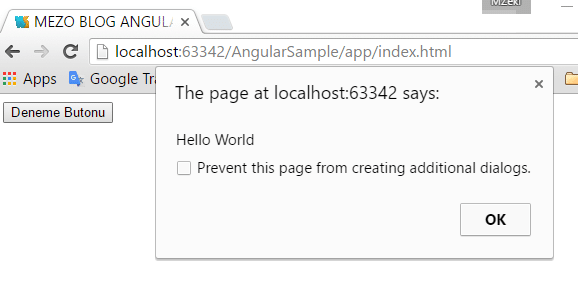
Bu yöntem ile bir angularjs uygulamasının içersine bir controller tanımlayarak bu controller içersine yazdığımız her kodu ve aldığımız her değeri html elemanlari üzerine aktarmamızın ne kadar kolay olduğunu görmüş olduk . Son olarak bu işlemin çıktısı aşağıdaki gibi olacaktır. Butona tıklandığında controller içersindeki metot çalışacaktır.

angularController2

Umarım yararlı olur

Bilgiyle Kalın

M.Zeki OSMANCIK

    Join our Newsletter

    We'll send you newsletters with news, tips & tricks. No spams here.